Special for The Arizona Republic
Feb. 25, 2006 12:00 AM
Although you may not be planning "fais do-dos" - for y'all non-Cajuns, those are big all-night parties - in your back yard just yet, there are things you can start planning and doing now to perk up your patio's attraction.
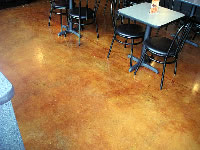
Acid-staining concrete is growing in popularity.
| advertisement | |
This stain can be used on almost any kind of concrete surface, inside or out. A stained floor can last forever if proper care is given. Unlike paint, it penetrates the surface and a chemical reaction occurs to change the color. Therefore, the color won't chip or peel.
Here's a brief overview of the steps that must be taken to acid-stain concrete:
Step 1 - Clean surface
Before starting, the concrete must be clean, free of paint, grease, dirt and other contaminates. Do not use acid wash during this stage. After the floor has been cleaned, it must be given ample time to dry.(For details on this step, www.rosieonthehouse.com, click on "FAQs," then on "concrete.")
Step 2 - Stain
Like all do-it-yourself projects, be sure to wear protective items recommended by the manufacturer and follow all instructions and recommendations to the letter. Before applying the stain, be sure all walls, wood and metal are covered.The easiest way to apply the stain is by spraying. An all-plastic insecticide sprayer works well. Shake the stain container well before using - be sure the lids are on tight - then begin spraying, keeping the end of the wand about 18 inches from the floor. Coat well, but do not create puddles. (Dark rings can occur.) Let the floor dry completely and repeat the staining process. The color will deepen with the second coat. Acid-staining will not hide imperfections in the floor. Do not touch or walk on the floor while it is wet.
Step 3 - More scrubbing
After the stain has had several hours to dry, scrub the residue using a medium stiff-bristled brush and a water-ammonia mixture (5 gallons of water for every pint of ammonia). Remove the water-ammonia mixture, preferably with a wet vacuum. Or use a squeegee or mop. Again, wash the area, but use water only. Repeat this step until all residue is gone. Allow the floor to dry completely.Step 4 - Apply sealer
There are several sealer options from which to choose. For exterior, consider a water-based or solvent-based acrylic. (Keep in mind, the solvent will darken the color.) For interior, a two-part epoxy or urethane sealer is best. If you're worried about slick surfaces, an anti-slip additive can be added to the sealer. Sealers are best applied in two coats by using a roller and giving the floors at least 6 to 8 hours of drying time between coats.Step 5 - Upkeep
A good maintenance program is vital to keeping floors sealed and looking their best. Again, refer to the manufacturer's instructions for best results. A vinegar-water cleaning solution works well for interior floor cleaning. Usually, exterior surfaces will need to be rinsed and cleaned often and resealed every 1 1/2 to two years.Next Saturday: If you've stained your floors but are looking for an easy, creative way to dress them up, check out our simple and affordable project that will look like you spent lots of time and hard-earned money to make it look that good.
For more do-it-yourself tips, go to rosieonthehouse.com. Rosie Romero is an Arizona contractor who has been in the Arizona home-building and remodeling industry for 35 years. He has a radio program from 8 to 11 a.m. Saturdays on KTAR-AM (620) in the Valley and from 10 a.m. to noon Saturdays on KNST-AM (790) in Tucson.

